100 Days of Franklin - Week 8: Breath
Week 8 is a guest week brought to you by Vera Salvisberg, who is a certified Franklin Method® instructor, teaches Blues dancing and travels all over the world to study, practice and live movement.
Breathing week! I’m very happy to share some exercises about breathing to start off the second half of the 100 days of Franklin. The goal of this week is to play with the many different mechanisms how we can breathe, and explore the effects they have.
A lot of inspiration will come from the book “Anatomy of Breathing” by Blandine Calais-Germain (abbreviated in the following as AOB; original version in French: “Respiration, anatomie - geste respiratoire”), which is an amazing source of anatomical knowledge and exercises for breathing. This will be complemented by some imagery from DATI chapter 15.
To start the week, I invite you to observe your breathing throughout the day. Which parts move? Which muscles do you feel engaging or stretching? How does it change when you lie down, sit, walk, run, sing, speak etc.?
Day 50
We’ll start with some terminology. Respiration refers to the exchange of oxygen and carbon dioxide. In the body, that exchange happens:
- between the air in the lungs and the membranes of small balloon-like structures called alveoli (external respiration)
- between individual cells and the blood (internal respiration)
- to a VERY limited amount, your skin participates in respiration too. Time how long you can hold your breath in the bathtub vs. with dry skin!
We will refer to the first process as “breathing”, this is the one we’re interested in: how can we exchange the stale air in the lungs for fresh air? The other two are automatic and cannot be changed much (but try the image that every cell is a little lung, breathing in the same rhythm as your big lung).
Before we go into specific mechanisms of breathing in the next few days, I’d like to explore the “respiratory volumes”. This refers to the fact that we can fill our lungs to varying degrees. For each volume, do you feel your muscles working on the inhale or the exhale? Which parts of your body are moving? Place your hands on your sternum, your ribs, in the back, on the abdominals, etc.
Start by sitting quietly until your breathing becomes steady. As always, we’re just observing, not changing or judging. Now turn your focus on the little stop (called an apnea) after the exhale. At this point, all your respiratory muscles and the elastic lungs themselves are relaxed, this is your neutral point. Enjoying and slightly lengthening that apnea is a wonderful relaxation technique! The volume that we breathe in when at rest is called the “tidal volume TV”. If at any point during this week you feel yourself getting uneasy or dizzy, you’re probably over-oxygenating your brain. Return to breathing in tidal volume until you feel better.
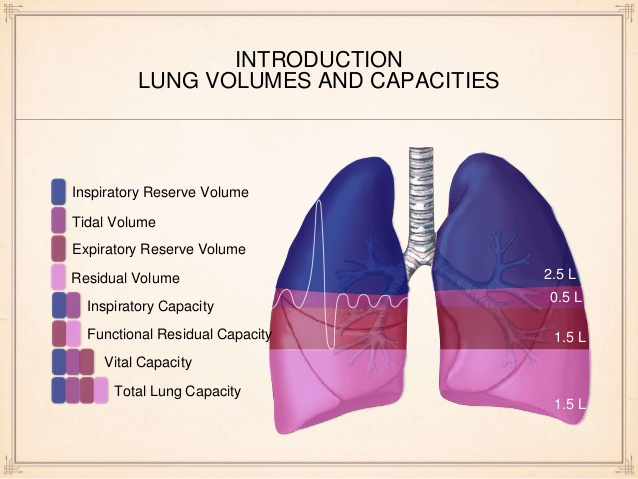
The next volume we want to explore is called the “expiratory reserve volume ERV”. From the neutral point after an exhale of TV, you can exhale further! If you press out as much air as you can from your lungs, you are exhaling the ERV. The air remaining in the lungs is called the “residual volume RV”.
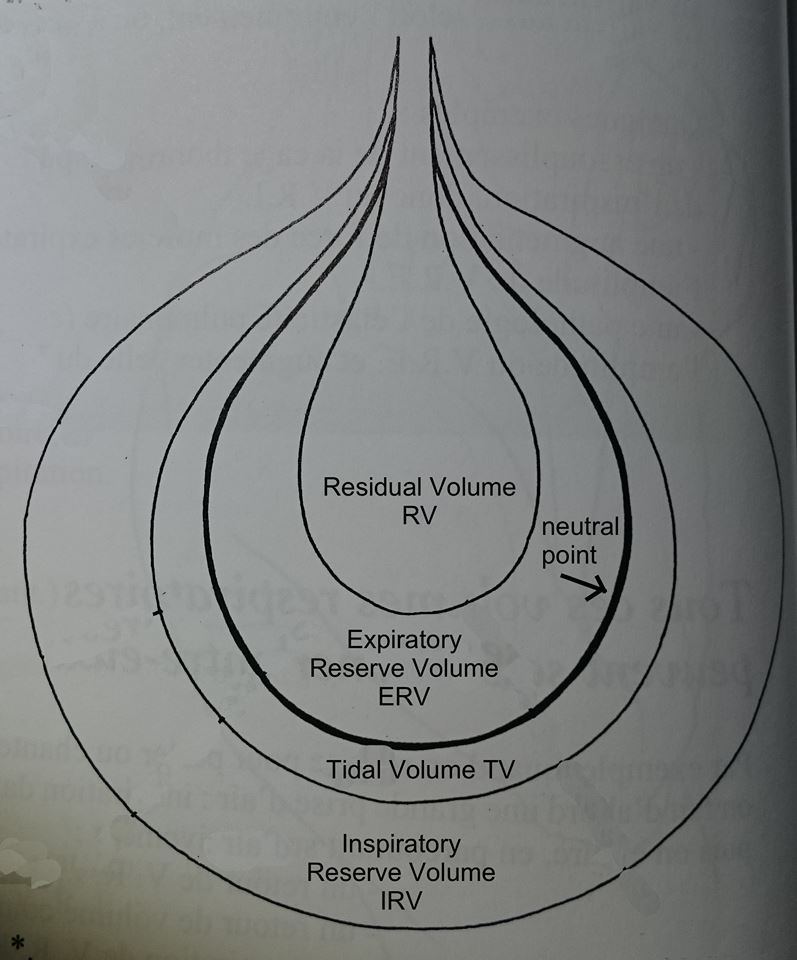
Go back to breathing in TV for a bit. After you inhale the TV, see how much more you can inhale, filling your lungs to bursting, holding the air for a moment, and then letting go. After each such big inhale, go back to a couple breaths in TV to avoid getting dizzy. The volume you are inhaling in addition to TV is called the “inspiratory reserve volume IRV”.
Day 51
Let’s start at the top of the respiratory system: We have two options, either we breathe through the mouth or through the nose. Generally, breathing through the nose will give us quality air: humid, purified (of both particles/dust and bacteria via the enzymes in the mucus) and warm. Thus this is the preferred way for tidal volume breathing.
Breathing through the mouth on the other hand gives us quantity: there are less obstructions and the path is slightly shorter - when you run, you use your mouth because you need a fast IRV-TV-ERV respiration. Most modalities that don’t require a lot of oxygen will prefer an inhale through the nose, although some forms of theater and trauma work seem to use an open-mouth inhale for its psychological effects. For the exhale, again if quantity is important, the mouth is preferred. In Qi-Gong, exhaling through the mouth is thought to circulate energy and release tension, whereas exhaling through the nose accumulates energy.
- Let’s do the drinking straw experiment (adapted from DATI ch. 15 and RyNLyS p.11): If you don’t have a straw handy, exhale with a slight hissing sound, otherwise take a normal drinking straw and breathe out through it. Breathe in normally through your nose, while holding the straw in your hands (not between your teeth) - take care not to take deep breaths, as this can make you dizzy, and breathe normally for a bit after every three to four straw breaths. Then you can add shoulders to the straw breaths, lifting on inhale and lowering them slowly when exhaling (but keep hands and arms relaxed). After 1-2 alterations, take a break and see what changes you can feel in your shoulders, posture and breathing. This exercise is very calming, has a relaxing effect on the nervous system, and deepens the breath.
- I have seen a related exercise in my yoga class: start with your head slightly looking down (but still balancing on your neck, remember last week). Instead of using a straw, roll your tongue into a straw! Now inhale through the rolled tongue, at the same time lifting your head until you’re looking about 45° up. Hold the breath and slowly lower the head to neutral (looking straight ahead). From there, exhale through the nose, lowering your head again. This exercise is thought to have a cooling effect.
- Let’s move down to the neck and shoulders and finish with an internal massage of the top of the lungs (DATI ch. 15). For this, start by rotating your left shoulder, imaging how all the muscles and bones give a nice massage to the top of your left lung, so it can regain its elasticity and move around freely in the lubricated pocket (called the pleura) that contains it. Change direction. Then stop moving your shoulder, and just breathe, feeling the widening of your left lung and the air “going into” the area around your neck and under your left clavicle (the air only ever goes into the lungs. But the lungs can expand in various directions, depending on which muscles and organs are active). Image a sponge being compressed when you exhale, and then expanding and filling as you inhale. Compare the two sides and move a bit (side-bends, standing on one leg, arm raising…). What do you notice? Then do the other side, and afterwards see what changed with respect to your posture, breathing and movement before the lung massage…
Day 52
To inhale from neutral position, we need to make the lungs bigger. Because the lungs themselves are not muscles, they cannot expand actively. But they are elastic, so if we “pull” on them, they will expand. We can image the lungs as floating around freely in their bag (the pleura), no muscles attach to it directly. Rather, the pull that makes them expand comes from the fact that there’s a bigger volume to fill, which creates a little vacuum, and this under-pressure draws surrounding air into the lungs.
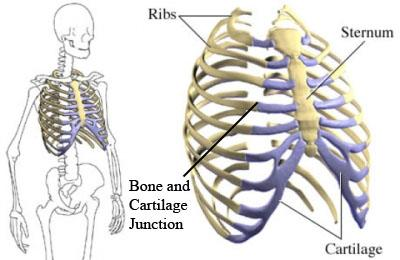
So how do we increase the volume available to the lungs? There are two broad categories of mechanisms: either expanding the ribcage, or moving down the abdominal organs (we’ll explore this tomorrow). For the first one, we need to think of the ribcage as a very mobile area. Each rib connects to elastic cartilage which connects to the sternum (except for ribs 11 and 12 at the bottom). The ribs themselves are unique in the body in that they are quite elastic. When you roll on some Franklin balls, you can feel the flexibility of the ribs, in particular when rolling out the sides of the ribcage (carefully, don’t put too much weight). This is an excellent exercise to keep the ribcage mobile!
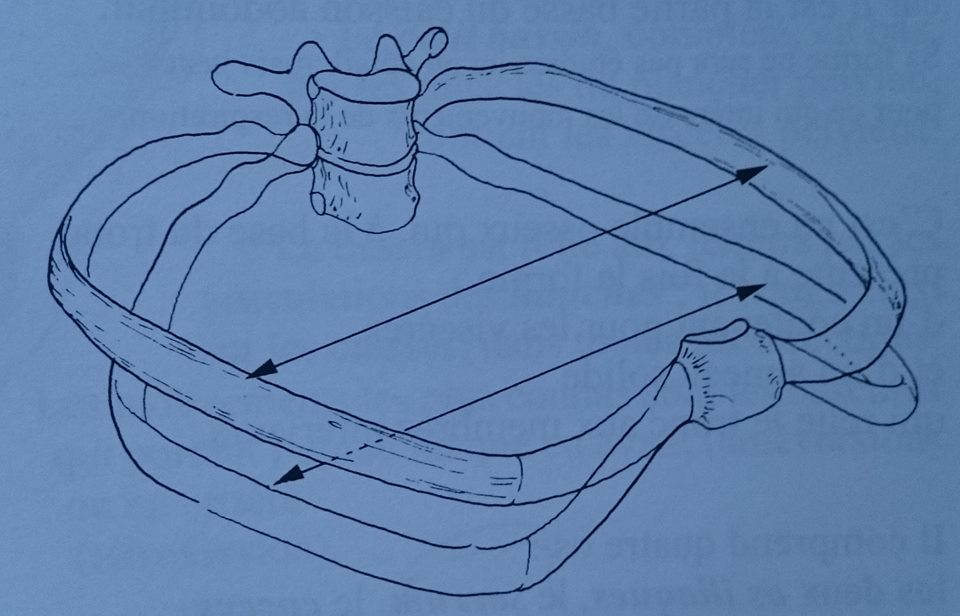
Each rib also articulates with two vertebra and a disk at the back, and can move in two directions: the first is by lifting the sternum/front. We can picture this as lifting the handle of an old-fashioned pump (the front of the ribcage). Second, the rib gets elevated on the sides, this is like lifting the two handles of a bucket (the sides of the ribcage). Both movements increase the volume of the ribcage, because the ribs are slightly angled down when at rest. So bringing them up will create more space, which the lungs will fill happily. At the top of the ribcage, the “pump” direction is more pronounced, while the bottom ribs have more mobility and get considerable movement in the “bucket handle” way.

There are many different muscles that can move the ribs. Yesterday in the third exercise, you’ve probably started using the SCM and scalene muscles in your neck, which elevate the sternum and the first two ribs. The small pectoral lifts ribs 3, 4, 5 in an inspiration that’s “under the clavicle”. The big pectoral and the serratus anterior will open the middle and lower ribs in the bucket fashion, increasing the opening of the triangle at the solar plexus. A whole group of muscles attaches to the spine and can also lift the ribs in bucket fashion. Furthermore, extending the spine (flattening out the thoracic curve) also increases the thoracic volume.
- Now go ahead and experiment with some different ways of inhaling and exhaling using your ribcage. Redo yesterday’s third exercise to find the high inhale, then stand or sit with the back of your ribcage against a wall to keep it fixed and think of lifting up and lowering the sternum. You can image that the breath lifts the sternum and your brain will activate the right muscles, even though you know now that the causality goes the other way around. Don’t forget to lower the sternum on the exhale, you can exagerate both directions to find this movement. Also notice where your neutral point is. Then, try 2-3 breaths that come from straightening and bending the spine, without using any of the other muscles (and keeping your shoulderblades relaxed).
- To find the “bucket handle” movement of the lower ribs, image that your chest is like an umbrella that opens (Lulu Sweigard). You can put your hands on your sides to feel this.
- There are many more muscles in the ribcage area that have an expiratory effect. If you breathe in TV or IRV, you will activate your muscles on the inhale, and then just relaxing them will make the ribcage and lungs return to their initial shape. However, for a fast exhale, or to exhale the ERV, you can feel the expiratory muscles activating.
Day 53
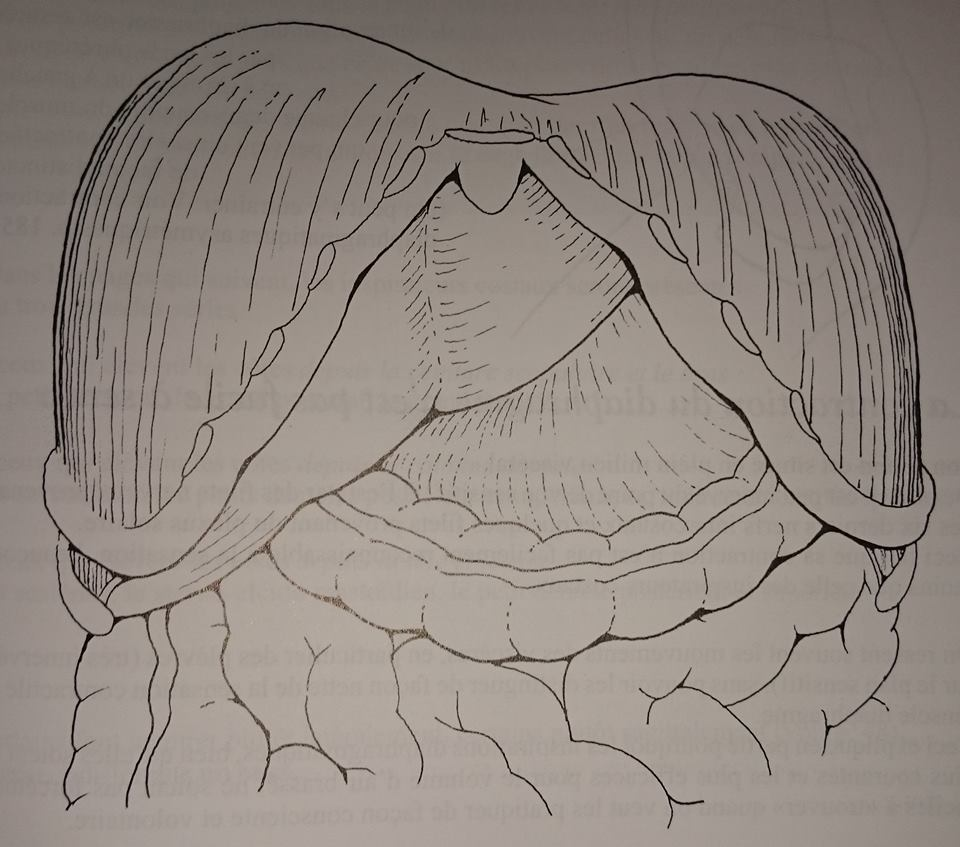
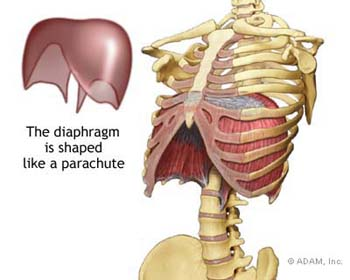
Now we finally get to the most important muscle for breathing: the diaphragm! The diaphragm has the shape of a dome, like a mushroom or a parachute. It is situated below the lungs and heart, between the tip of your sternum and your lowest ribs, and drapes over your digestive organs. It is slightly tilted with the right side higher up because the liver is on the right, and it takes more space than the stomach on the left. Furthermore the heart needs some more space above it on the left. The lower border of the diaphragm attaches all around to the lowest ribs and the tip of the sternum.
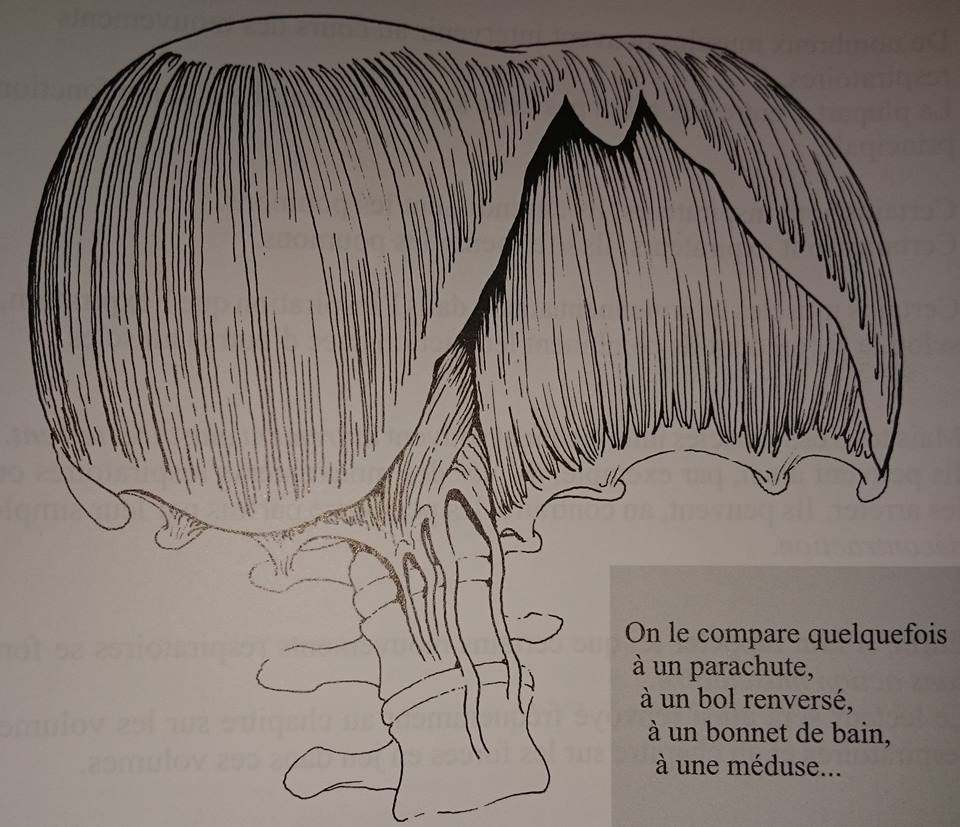
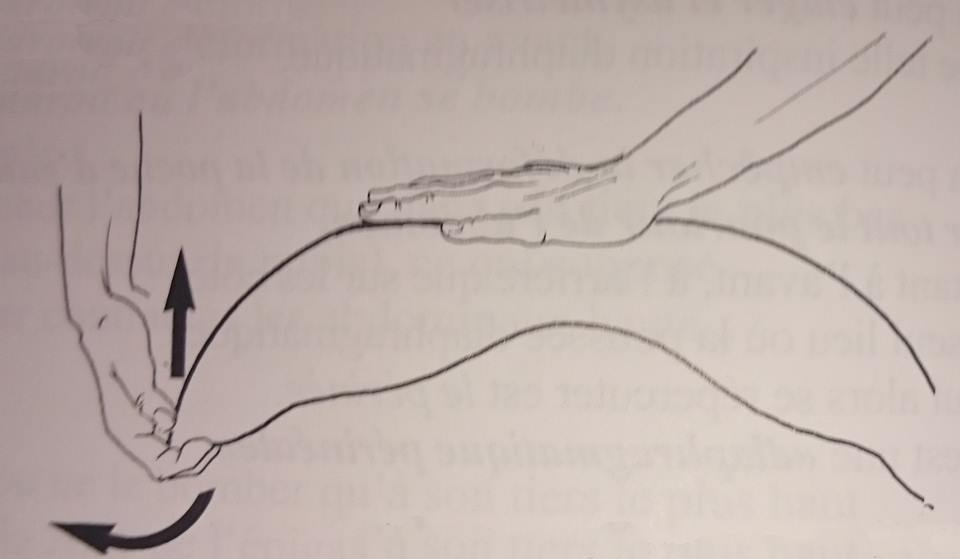
When the diaphragm contracts, it pushes the organs down and thus creates a vacuum in the thorax which causes the lungs to fill with air. Make sure you understand why a contraction of the diaphragm results in a downward movement: imagine that the lower border of the parachute is fixed by the strings, and there’s an air stream pushing it up so it’s inflated in the centre (those are the organs). Now if the parachute shrinks (muscle contraction = shortening), the center is going to come down, pushing against the air stream. The movement of the diaphragm is thus essentially vertical, like an elevator going up and down.
-
Let’s start by stretching the diaphragm and the lungs (RyNLyS p. 17): Hold your right arm straight up and put your left hand on the right side of the thorax. Visualize the diaphragm under your hand and bend the upper body to the left when exhaling. Both feet should be anchored solidly to the ground. Imagine how the fibers of the diaphragm are stretching as it relaxes and lengthens in the exhale. When inhaling (the diaphragm contracts and moves down), stand straight again. Repeat this bending/exhaling and straightening/inhaling four or five times and compare sides; switch sides; compare to before.
-
The diaphragm itself is difficult to feel because it has few sensory nerve connections. But we can observe its effect: the organs get pushed out of the way, making the belly move. Let’s go back to yesterday’s second exercise, breathing by opening up the ribs laterally like bucket handles. These instructions could lead to (at least) two very different breathing mechanisms: does your belly go in or out when you inhale? What do you think it “should” be doing? If you open your ribs to a large extent without also using the diaphragm, your organs are actually getting sucked up, making the belly go in. This is called paradoxical breathing, and it’s what beginners often find first when they’re trying to use the diaphragm, because the muscles moving the ribs are much easier to feel. As the name already indicates, this is not a mechanism we should be training, because it’s not efficient. We’re actually filling some of the thoracic space with organs instead of air! So now start breathing slowly by inflating the belly on every inhale, and then add the ribs, making sure that you only open them as much as you can with the belly still going out. This is your diaphragm working to push the organs down!
-
I’d like to finish with an exercise from my yoga class: lie on your back, with your knees to the chest, but with some space between knees and body. Now we split every breath into an abdominal and a thoracic part. Start with full lungs, and exhale by letting the belly fall to the ground, this brings your knees closer to your chest. But your ribs should still be open, so the second part is to exhale all the air out of your thorax, and we assist this by slightly curling the head and sternum. Imagine that you’re a fern rolling yourself in. But your shoulderblades still stay on the ground. Then we inhale in the reverse direction, first with the ribs, unrolling your spine and head onto the ground. Is this more of a bucket handle or a pump inhale? Second, we breathe into the belly and let the knees move away from the chest a bit. This is also a great relaxation exercise!
Day 54
Constructive rest Friday! The primary goal of constructive rest is to allow the body to reorganize and change patterns by taking away the strain of gravity and decreasing the muscle tone as much as possible. This week, we would like to focus on breathing. Since we need very little oxygen when lying down, we will take slow breaths and switch back to regular breathing whenever we start feeling over-oxygenated/dizzy.
Lie on your back on a semi-hard surface (not in bed) in a comfortable position. If your lower back arches when you stretch out your legs, you can either put your knees up or even put your calves on a low stool or bed. If your legs fall towards each other put a pillow between them, if they fall to the outside tie a belt or scarf around them. If your neck arches (making your chin stick up), you can put a couple books under your head. Set a timer to 7 or 14 minutes and try the following images:
-
Your breath is a researcher: it goes through your body looking for tension. When it finds some, the breath fills that spot and dissolves the tension, and the exhale takes it all away.
-
Your belly button as a flower petal (DATI ch. 15): on exhale, the flower petal sinks down towards the ground, and even through the ground into infinity. On inhale, you create a new petal on your belly button. If you don’t like flower petals, you can image a red fall leaf, or maybe a snow flake :)
-
Your full body is a balloon (Masunaga): When you inhale, you first feel your chest, abdominals and pelvic area expanding. As you continue inhaling, you inflate your arms and legs as well.
Day 55
Today, we’re going to refine our understanding of the diaphragm. In day 52, we’ve introduced what’s called the first mechanism of diaphragmatic inhalation: the diaphragm moves down, making the organs move. Sometimes you hear teachers say: “Breathe into your back”, ”breathe into the belly” etc. Remember that the air only ever goes into your lungs, but the organs move out of the way and push in different directions, depending on which muscles are tight and which can be moved.
-
The pelvic floor is a balloon (DATI ch. 15): Lying on your back, feel how your pelvic floor expands when you inhale. Image that there’s a balloon inside your pelvis, and when it inflates on inhale it creates space in the pelvis for your organs to go. You can picture that the ring of your pelvis connects at the pubic symphysis like when you make a ring with your arms and put your fists together in front of you. On inhale, the ring gets bigger, and your fists move slightly apart, creating space in the pubic symphysis. When you exhale, the balloon deflates and you can feel more pressure on the symphysis again.
-
Let’s try to “breathe into” all the following areas individually: Pelvic floor, the lowest part of the abdomen, the middle part (where the waistline is), the solar plexus area. Some might take several day’s practice to find, and some might be easier to experiment first on exhaling. Then you can sit on a chair or a stool and lean forward, putting your hands on different parts of your back and trying to make them move with your breath. And if you’d like a challenge, see if you can breathe asymmetrically only on one side :)
-
Last, we will see the second mechanism of diaphragmatic inhale. When all lower trunk muscles are tightened, the organs can’t move out of the way. Who has heard cues about engaging abs, pulling the belly in etc.? What does it do to our breathing? When the diaphragm can’t move down it will make the lowest ribs open when it contracts. On day 52, we saw muscles that can open the ribcage from the outside; the diaphragm opens the lowest ribs from the inside. This is very hard to find, again because the diaphragm is difficult to feel. Sit on a chair and keep your abdominal muscles and pelvic floor tight. Then try to inhale by letting the bottom of your ribcage open, but without using the muscles on the outside. Most likely you shouldn’t feel any muscles engage - the fact that you’re breathing and ribs are widening means that the diaphragm is at work!
Day 56
We’re already at the end of the breathing week! Today we’re not going to see any new mechanisms, but rather combine all the different mechanisms into “la grande respiration complète”, the big complete respiration (AoB). Students in many different modalities train this technique as the preferred way of breathing for relaxation and slow-ish movement (for a cardio workout you need more air faster). It mobilizes the whole trunk and thus prevents tension from accumulating. We’re inhaling TV and IRV, and exhaling back to neutral (to start, you can exhale ERV as well).
-
We’re starting with a diaphragmatic inhale of mechanism 1 (diaphragm going down), expanding the pelvic floor and lower belly. Then we keep inhaling by expanding the lower ribs and upper belly/solar plexus (diaphragmatic mechanism 2). Lastly, we open the top of the ribcage and the sternum (see Day 51). To exhale, we again proceed from the bottom, moving the belly back in, then closing the lower ribs and finally lowering the sternum and top of the ribcage. Try the image of squeezing out a tube of toothpaste from the bottom on exhale (thanks Tara Brough!). Breathe slowly and place a little apnea (stop) between each inhale and exhale to differentiate them clearly. In particular, wait until the next inhale to let the belly expand again - don’t let the lower abdomen expand when you close the ribs, otherwise you’re not exhaling. You’re also not inhaling as much as you could if you let the belly go in when the ribs expand.
-
Once you’re comfortable with three stages, you can try and make even finer subdivisions, with the end goal of having a smooth wave going through the whole trunk, always from bottom to top (for both inhale and exhale). To get a feeling for a specific area, you can also breathe with just that part for a while, and you can partition the breath into steps (pause - inhale a bit - pause - inhale a bit more - …). Also try how the wave changes when you’re standing, lying on your back, on all fours etc.
-
I would like to leave you with homework for your next social dance: Many of us instinctively “hide” their breathing from their partner when partner dancing, especially in closed embrace. In doing so, we block both the abdominals and the ribs from expanding. Not only are we dancing in apnea, those tense muscles will make it much more difficult to move! I invite you to think of your breathing when dancing and get into the habit of mobilizing the whole trunk in every respiration. Your partner might even join you, and what deeper connection than the breath could we wish for? At the beginning you might feel unstable, that could mean that you’re abusing your diaphragm to “stabilize” your ribs in a slightly opened position, constantly keeping the diaphragm tensed up in the position of a mechanism 2 inhale… If you can instead use it to breathe and mobilize the whole upper body, you will gain a lot of freedom in your dancing and posture :)