100 Days of Franklin - Week 5: Spine
Spine week. We’re going to go for fewer exercises and more repetition across days this week.
See you tomorrow and may you always find at least 5mn in your day to work on your body and well being!
Day 29
Picture your spine. Where are the different parts of it relative to your central axis? What is its shape?
We have 7 cervical vertebrae, 12 thoracic, 5 lumbar, a sacrum and a tail bone. Do these distinctions correspond to physical realities for you? To what extent can you distinguish or count your vertebrae? Can your roll down and back up counting each of them?
Examine your range of movement. Sliding and rolling forward and back, and side to side. Twisting. Which parts of your spine are the most mobile and in which directions?
Compare standing and walking with a spine in a “perfect” position with standing and walking with a spine aligned in movement (and constantly moving/adjusting).
Day 30
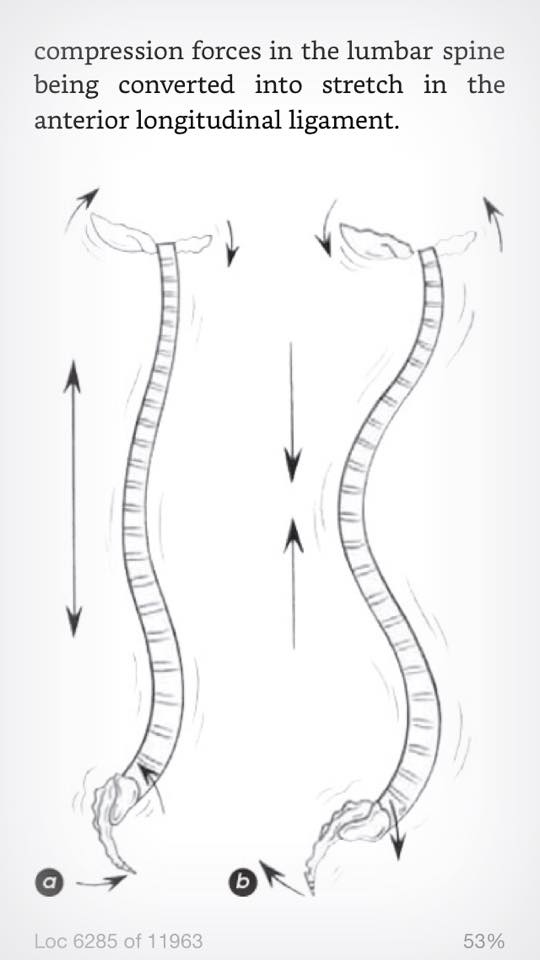
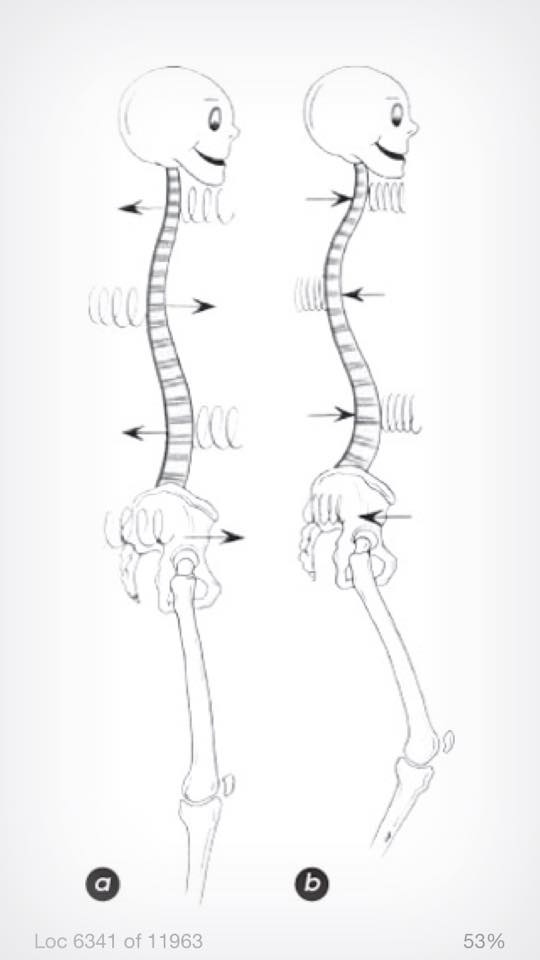
The spine is a really impressive design. It needs to be flexible to allow movement, and resilient to support the body. It also needs to be a shock absorber to protect the head, and the spinal cord. The way it does this is to behave like a spring. Whenever it needs to absorb anything in an up/down direction, the curves in the spine deepen, distributing laterally into the ligament/muscle system, storing up energy like a spring coil, ready to bounce back up again.
Stand comfortably and imagine the four curves of your spine as being perfectly counter balanced. As you bend your legs, feel the curves of the spine deepen. The cervical and lumbar curves deepen forward. The sacral and thoracic curves deepen backwards to balance out. As you straighten up, imagine the curves getting shallower, again maintaining balance throughout the spine.
As you bend your knees and straighten, picture your spine shortening and lengthening [my Alexander teacher would want you to let the spine be long - as usual, these are images of letting your body do things it naturally wants to do, not forcing some kind of artificial movement]. Compare with what happens if you picture your spine staying the same length.
Place a hand on your neck and a hand (palm or back of hand) in your lumbar curve. As you plié, feel the softening of the lumbar spine and neck. As you straighten your legs, feel the curves cradling back into the hands and the spine lengthening.
Rebounding Curves. As you bend your spine, imagine the lumbar, thoracic and cervical curves resting against springs located at their apexes. As you bend your legs, the springs are compressed, as you stretch your legs, the springs rebound and push the curves into length. [DATI chapter 12]
Day 31
Let’s work some more on spinal curves. But first, let’s dust the cobwebs off the spine a bit:
https://www.youtube.com/watch?v=o6ACRKIIejo (Laura is quite amazing - don’t watch any of her other videos right now or you’ll get nothing else done today).
With this new freedom in the spine, feel how much more of a difference you can place in the curves as you plié up and down. Use any of yesterday’s images:
- perfect balance between the curves
- spine shortening and lengthening
- neck and lumbar spine moving forward and back
- springs compressed by the deepening curves
Thinking of Laura’s videos, I’m reminded of a video I watched about 18 months ago, where she talked about the sacrum being a diving board for the spine. I can’t find that video, but here is another talking about the same idea: the nutation of your sacrum acts like a diving board with the top of the sacrum (where it meets the lumbar spine) nodding down and forward, ready to spring up and back. http://www.carolguidry.com/Franklin_Method_for_Dance/Archives/Entries/2013/4/1_Down_with_Plies-How_to_Do_Plies_that_Nourish_the_Spine.html
Day 32
It’s giraffe party time! (hat tip to Ruth Evelyn, a Blues teacher who uses Franklin and many images in her teaching)

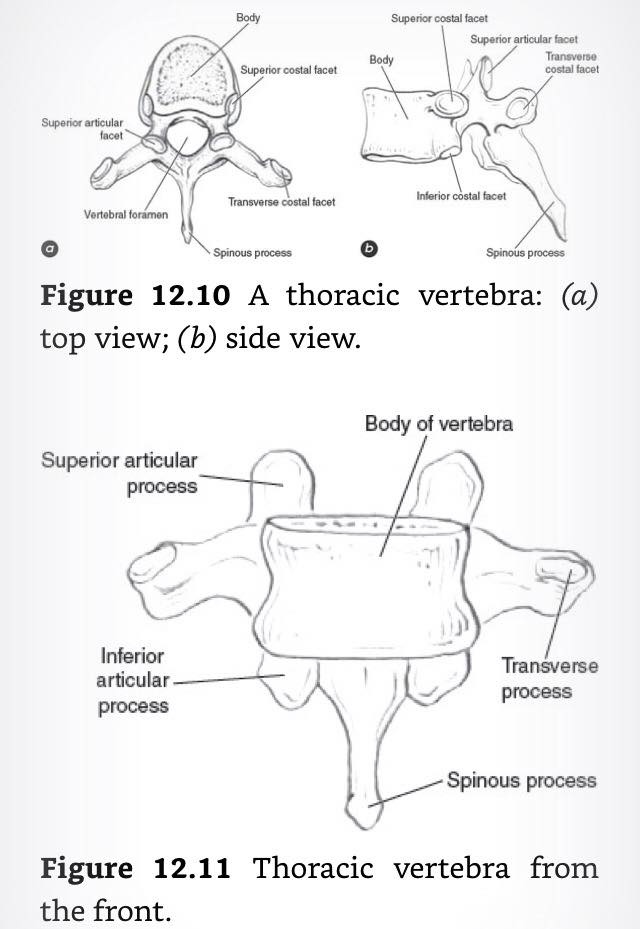
Today we’re going to focus on the individual vertebra. A vertebra has a cylindrical body, which is the main part of the “stack” of vertebrae making up the spine, separated by disks. Behind it, a vertebral arch sticks out, consisting of two upper and two lower articular joints (to articulate with the vertebrae above and below), and three processes to which many muscles and ligaments attach - the spinous process sticking out the the back and the transverse process sticking out to either side.
The part that is touchable near your skin is “just” the spinal process. The center of the body of the spine ranges from ~2 cm in (ballpark figure, I wasn’t able to find actual measurements) at the cervical spine, to ~4-6 cm in at the lumbar spine. The body itself also varies widely in size, from around thumb width sized in the cervical spine, to wrist width size in the lumbar spine.
Picture the space occupied inside your body by your spine. Which parts of the center of your spine are on your central axis? Notice how the spine is deep inside the back, almost as close to the front as to the back in the lumbar area. Turn about your central axis, noticing how different parts of the spine are describing different sized circles
You can think of the back part of the vertebra as a giraffe head. The spinous process is the long nose and mouth. The transverse processes are the ears. The upper articular joints are the horns and the lower articular joints are the bottom/back of the jaw.
Think of your spine as being made up of 24 individual giraffes. They each have their own shape and personality. Move, letting them twitch their noses and waggle their ears. It’s party time!
Different species of giraffe live in different parts of the spine. They differ by their size, the stubbiness or length of their nose, and the shape of their horns and lower jaw. Notice how the cervical giraffes can move about in all directions, the thoracic giraffes like to roll to the side and twise, while the lumbar giraffes like to roll forward and back. Notice the hybrid giraffe where the different parts of the spine meet.
As you roll down, notice how each giraffe’s jaw slides up off the horns of the giraffe below, before waving its nose up in the air (like it just doesn’t care).
As you roll up and then stretch back, notice how each giraffe’s head comes back so its eyes are looking horizonally, and then nuzzles nose of the giraffe below it.
Last, the wind picks up, blowing from your front. The giraffe let their heads bob about in the breeze, lining up so that they are all facing away from the wind.
Day 33 One third of the way through! And it’s constructive rest day!
Lie in constructive rest. Imagine your spine is perfect. It moves just how you want. Dancing like a tree in the breeze as you stand still. Bouncing like a spring as you bounce up and down. Partying like a bunch of Giraffe as you move.
Imagine your spine is made up of tiny spheres. Brush all the cobwebs off them, and watch as one of the spheres comes alive with motion. At first there is just a gentle stirring. But then the rocking inspires its neighbours. Soon this inspiration has gone viral and the whole spine is in motion.
Day 34
Let’s involve the pelvis in spinal alignment and mobility. Although the sacrum has some degree of movement independent of the pelvis, to some extent they must move together.
Finding a good pelvic tilt is challenging. Too much anterior rotation (rolling forward, sacrum lifting), and the default curve of the lumbar spine is deepened, giving it less range of movement. Too much posterior rotation (tucking, rolling back, sacrum lowering), and the curve of the lumbar spine is erased, preventing it from participating properly in the springyness of the bent spine. It also puts strain on the hip joints and prevents flexion.
A good pelvic tilt/freed sacrum will leave your back springy, released and mobile, without having to “hold” a position. It may also feel weird at first.
Let’s try various strategies for finding this, and see how much freedom we can then find in this week’s images (giraffe, springs, balance, perfection, spheres movement, brushing clean).
- tapping (sternum, spine, neck, sacrum, whole pelvic area)
- lines of movement (especially the sternum-cranium line, the thoracic spine-sacrum line (week 2), the knee-femur line, the widening PSIS line and the narrowing ASIS line (week 3), and two new lines for this week: a line from the pubic symphisis to the 12th (bottom) thoracic vertebrae, through your lower center of energy; a narrowing line running left to right through the middle of your ribcage.
- letting the ASIS and PSIS lie in the same horizontal plane
- Imagine a string pulling up and forward from your pubic symphisis, lifting the front rim of the pelvis and leading you into walking
- Try the lumbar spine relaxation from this video: https://www.youtube.com/watch?v=ZlDWwR4A7ks
Day 35
Try yesterday’s images again, to find a pelvic tilt that allows your back to relax and become springy.
We’ll add in three ideas to try to improve this feeling even more:
- All along your back, the small muscles and ligaments along the spine are attached in a chain. A tight sacrum will lead to a tight neck. And a tight neck to a tight sacrum. Let your head release up from the top of your spine, floating perfectly balanced, like a balloon, tethered down by your spine. Let your sacrum release down off the bottom of your spine, dangling freely like a pendulum on a string.
- Your sacrum can feel a lot of responsibility. Imagine your sacrum is connected and supported by the whole universe, with elastic ties going out in all directions, letting it move freely without any danger of it falling, or any need for it to worry. (Hat tip to a Laura Hames Franklin video on scoliosis)
- Imagine each vertebra is a spotlight, shining “forward” of the vertebra. Each vertebra shines up and down depending on where it sits on the spinal curve. Let all these spotlights form a single vertical line on the wall. Notice how the intensity changes at different parts. The spots of the neck diverge away. The spots of the thoracic spine converge into a brighter zone. The spots of the lumbar spine diverge and the spots of the sacrum and tailbone converge.
Imagine the spotlight at the apex of each curve: first cervical vertebra, 6th thoracic, third lumbar. Let this light shine horizonally, far away. Imagine rolling down, one vertebra at a time. Imagine rolling up, with these “apex” vertebra ending up horizontal. Now roll down and up a few times for real.