100 Days of Franklin - Week 4: Shoulder Girdle
This week we’re working in the shoulder girdle. We’ll mostly be taking ideas from Relax your Neck, Liberate your Shoulders, rather than DATI. We’ll start off with some general exploration, touching, and metaphorical imagery, before going into bone rhythms and some ideas about the muscles.
Because my shoulders tend to be tense, we’ll work a lot on tension release.
See you tomorrow - may your shoulders never be tense!
Day 22
Explore your shoulder girdle, figuring out what you know and don’t know. How many bones can you find? Where do they articulate with each other? What do they do? How do they do it? What muscles are attached and where?
Imagine the arms shoulders and lungs are like a locomotive, pushing a train from behind. Start with the right arm, holding it up just in front of your chest. Push the hand outwards using the lower arm. Then push the arm even further using the upper arm. Now push the whole arm further outwards with the shoulder blade. And now the finale: imagine that the soft filling of the heart, thorax and lungs push the hand out even further. While doing this imagine the content of the thorax is honey, and that the hand is grabbing a beautiful peach, hanging in the air.
Now let the arms swing a bit, letting them hang, and stretching them out to compare lengths.
Day 23
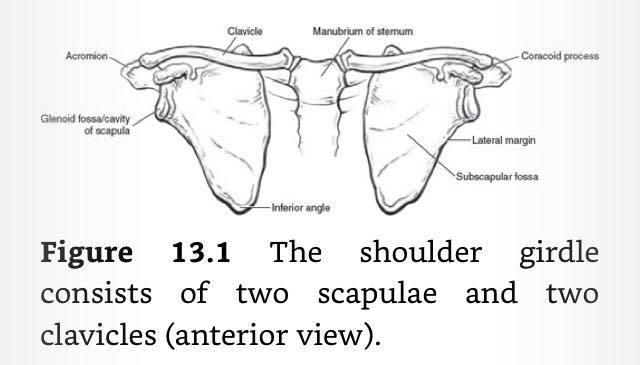
When examing your bones yesterday, you probably found two s-shaped clavicles. These clavicles join the top of the sternum in saddle-like articulations. They have a pretty wide range of motion. Towards our arms, they articulate with the shoulder blades. The shape of the articulation is that the acromion of the shoulder blade curves forward and around the end of the clavicle, like a finger. This articulation. forms part of the shoulder socket in which the humerus fits. The shoulder-blades (or scapula) do not connect with any other bones, but are the focus of attachment of various muscles involved in arm, neck and shoulder movement. Tap this area.
Explore your clavicles’ range of movement by pushing the left clavicle out so that you can hold it with your right fingers. Now move up and down, side to side and in circles. Try holding on to different parts of the clavicle (near to the sternum, in the middle, near to the acromion). Compare arm lengths and range of motion on both sides, then repeat with the right clavicle.
Move your left arm in space and note the feeling. Now move your right arm in space, imagining that all movement stem from movement of the clavicle, articulating at the sternum.
Starting from the fingers, explore how the weight of the arms carries down into the floor through the skeleton. The fingers connect to the hand, the hand to the arm, the arm to the shoulder blade, the shoulder blade to the clavicle, the clavicle to the sternum, the sternum to the ribs, the ribs to the spine, the spine to the sacrum, the sacrum to the pelvis, the pelvis to the femur heads, the femur heads to the legs, the legs to the feet and finally the feet to the floor.
Raise and lower your shoulders, imagining as you lower that the shoulder blades slide down the rib cage and come to rest on your pelvis (or imagine you’re gliding them into your back pockets).
Day 24
After tapping (and, if you like, massaging) your shoulder girdle, arms and chest, let’s explore the shoulder blades in greater detail (if you have a partner, help each other out).
They are basically inverted triangles. From the tip at the bottom, near the spine, the side near the spine goes almost straight up. The other side diagonals up towards the shoulder joint. If you follow the side near the spine upward, you come to a point where a ridge leaves towards the shoulder. From the point where the ridge leaves, the side of the shoulder blade also briefly continues upwards and inwards, before also turning into an inside ridge heading back in and slightly down towards the shoulder. The outside and inside ridges together form a valley that is the top “side” of the shoulder blade. The outside ridge turns into the the acromion, which meets the calvicle. The inside ridge turns into the coracoid process, the “front” of the shoulder blade, to which many muscles are attached, notably the pectoralis minor.
We don’t need to focus on the pectoralis minor itself at the moment, but this 3D video gives a pretty good overview of the area. https://www.youtube.com/watch?v=PV1LF9-6epQ
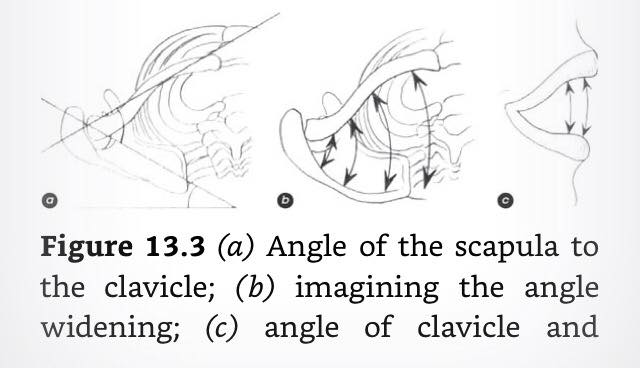
As you have noticed by now, the clavicles and shoulder blades are at an angle to each other, meeting at the shoulder joint and widening respectively towards the back and to the front. Imagine that shape seen from above, as a mouth. Picture the mouth yawning wide open.
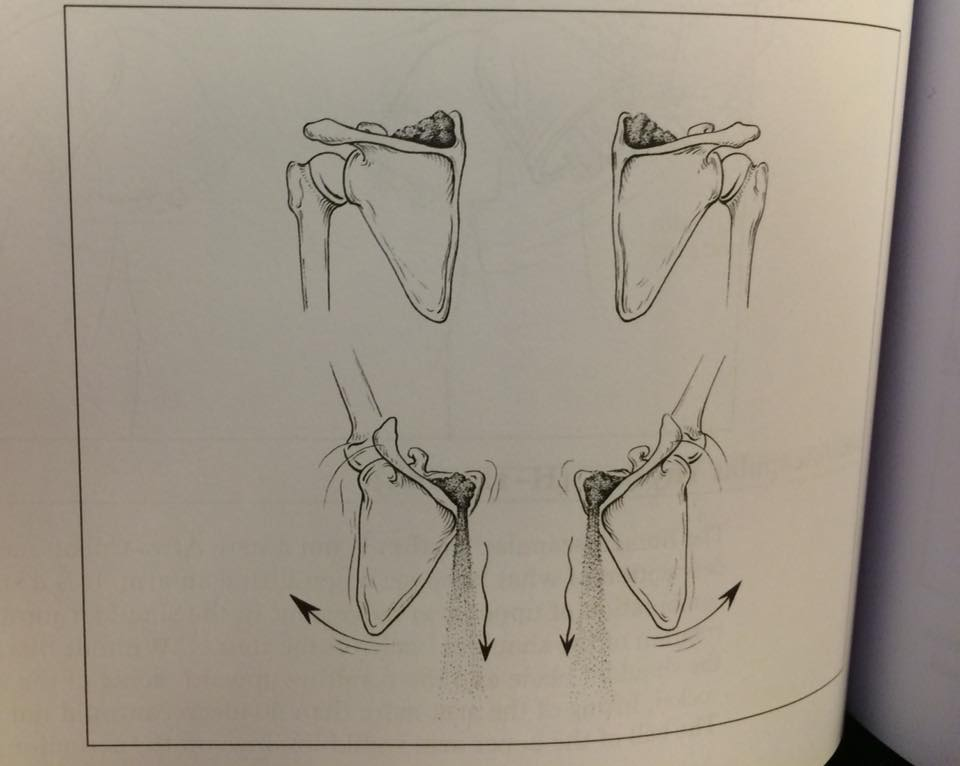
Raise your arms up to the side until they are above your head. The shoulder blade acts as a counterweight to this movement, swinging down and out.

Visualise the bottom tip of the shoulder blade swinging outwards. Imagine there is sand in the valley at the top of your shoulder blade. As you swing your arms up, watch the sand trickle out and down your back.
Massage the area below your shoulder where the coracoid process sticks out to the front. Imagine your shoulder blade is a small backpack and the coracoid process is where it clips to the front. You don’t need to use any muscles to prevent your shoulder blade from falling off your back, as it is securely attached at the front.

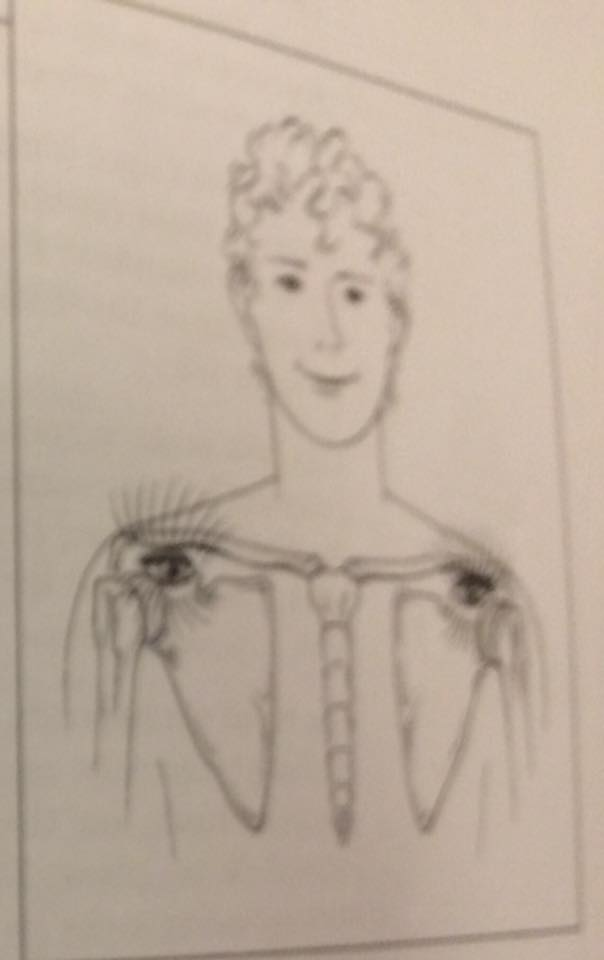
Often the coracoid is pressed downwards due to a sagging upper body posture, shortening the muscles that attach to it. Imaging down that the coracoid opens its “mouth” wide and yawns heartily in order to free itself from this pressure. After this we imagine that the coracoid processes are small sparkling eyes, two cat’s eyes, glowing in the dark. These coracoid processes shine from under the collarbones, floating upwards and lifting the front a little, while the back hangs down relaxedly [Relax your neck, liberate your shoulders].
Day 25
Time to identify some muscles. We worked on some scapular rhythms yesterday, so we’ll start with some of the muscles that attach to the scapula (there are over 18 total, we won’t go into all of them).
First, the trapezius. It is separated into 3 bundles and is the big one that is often tense and knotted. The top bundle connects the neck to the outside (lateral) third of the clavicle and is responsible for raising the clavicle. When you massage your neck/shoulders, this is the main muscle you’re massaging. The mid bundle connects the top 4 vertebra of the thoracic spine to the acromion and the (lateral) adjacent parts of the scapular spine. It is the one that gets super knotted. It is responsible for raising/rotating the outward edge of the shoulder blade. The bottom bundle connects the remaining 8 vertebra of the thoracic spine to the inside (medial part) of the scapular spine. It is responsible for lowering/rotating the inward edge of the shoulder blade. Check out this video: https://www.youtube.com/watch?v=Cicdi4Q98Z0
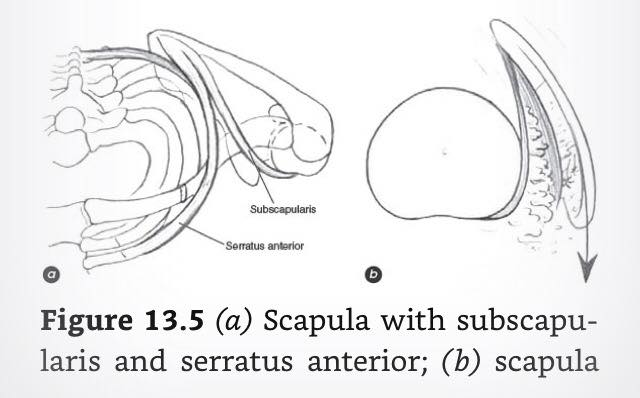
Next, the serratus anterior. It connects the medial edge of the scapula (the edge nearest your spine) to your ribs, much of the way round the front, passing in front of the scapula (underneath it). It is responsible for helping the scapula rotate round to the front to help it elevate the arm (as well as rotating round to the front when you cross your arms in front of you). It also helps keep the scapula nicely secured against the ribcage, as well as something nice for it to slide along smoothly. Check out this video: https://www.youtube.com/watch?v=-tlcuAKTr1Y
Finally, the subscapularis. It inserts at a similar place to the serratus, and goes between the serratus and the scapula, towards the humerus. We won’t get into detail of it’s functions, except, as you can see in the video above, it also provides a layer for the scapula to slide along smoothly.
Check out how these (and other) muscles contribute to raising your arm: https://www.youtube.com/watch?v=LKo5hlD6GW8
(NB: Rather than thinking of muscles lengthening and shortening, it’s more helpful to think of the fibres of the muscle as sliding into and away from each other, much like interlocking hair combs.)
Using a franklin balls between your shoulder blade and the wall, go over the rhythms of the shoulder blade as your raise your arm to the side (shoulder blade swings out and round), as you raise your arm to the front (shoulder blade swings down, then out and round), as you cross your arm in front and extend it to the side. Check how just letting one shoulder blade have “correct” movement, it settles into a much more relaxed position than the other shoulder blade. Repeat on the other side.
As you do these rhythms, visualise the functions of the different bundles of the trapezius and serratus anterior.
As you cross your arm in front and extend it to the side (adduction and abduction), imagine how the shoulder blade slides against the subscapularis, then against the serratus and finally against the ribcage.
As your raise your arm to the side, imagine the currents in the trapezius, flowing up through the top and middle bundles, and down and out through the bottom bundle. As you lower your arms into a relaxed position again, think of the opposite current, releasing the lower bundle upward, the mid bundle outward, and the upper bundle out and down.
Office chair trapezius active elongation. A typical office chair with a single connection between seat a back is perfect for this exercise. Our goal is to experience the rotation of the shoulder blade on the thorax, which is mainly procuded by the trapezius, or from another point of view - the thorax rotating on the shoulder blade.
Sit on the char and hold the connective part of the chair behind your back with your right hand and bend your head carefully to the left. Be careful - many of us are so tense in this area that it only needs a small movement to reach the limit of elongation. Daily careful exercising is better than a radical cure.
Because we are holding on to the chair, the shoulder can’t move upwards. If this were not the case, the trapezius would not be stretched. Visualize the descending [top and mid] trapezius fibers sliding apart from each other, and the thorax rotating underneath the shoulder blade. Carefully lift your head back up, rotating the thorax in the opposite direction. It can help to pull on the chair with your hand.
Repeat three times. Before changing sides, hold your arms up in the air and compare them.
Day 26
It’s Friday! Before going into constructive rest (tomorrow, for a change), we will just explore a few more muscles.
First, pectoralis major and pectoralis minor. For me these are super tight muscles that contribute a lot to lack of freedom in the shoulder girdle.
The pectoralis major is a fan stemming from the upper humerus and fanning out towards the medial part of the clavicle, the sternum and down towards the bottom ribs (where the abs connect). It is a twisted fan which is fully unfurled when your arms are up. It is responsible for movement of the arm. http://www.youtube.com/watch?v=-sDSLL3tXAI
The pectoralis minor is a smaller fan stemming from the coracoid process and fanning out to the 3rd-5th ribs. It lies under the pectoralis major and is responsible for some of the movement of the sternum (working in coordination with the serratus anterior).
To relax these muscles:
- Picture the fan shape of the pectoralis major and imagine the fan spreading out, starting from the humerus and going out to the clavicle, sternum and lower ribs. Encourage this spreading out by sweeping.
- Picture the current of the pectoralis minor flowing from the coracoid process to the ribs, massaging the area in circles as if spreading out dough.
- As you raise your arm, picture the unfurling of the fan. Moving your arm in and out, hold your pec in your hand and visualise the muscle filaments sliding into each other and sliding out again. Don’t forget to breathe
- Hold your pec with one hand at the armpit, imagining it is a sponge. As you swing your arm forward, gently squeezing it. As your arm swings back, release it again. After about 10 times, compare the two sides and repeat on the other side.

And second (or bonus as this has been a long day already, if so, skip to the last paragraph), two sets of muscles that elongate when you raise your arms: the rhomboid and the levator scapulae. Allowing these muscles to elongate with strength and elasticity will contribute to smoother movement and posture.
The rhomboid is a deep set of muscles linking the spine to the medial edge of the scapula. The levator scapulae links the top of the neck to the top of the medial edge of the scapula. Together, these muscles allow the scapula to hang “off” the spine. They are often tight - giving them permission to release will let your shoulder blades hang with both more stability and more mobility. https://www.youtube.com/watch?v=3nhC0wUrUFE
As you raise your arms, imagine these muscles working eccentrically (they are stretching out, but instead of letting go, the are gently placing the scapula in its outwardly swung state). Visualise the space between the shoulder blades, and between the shoulder blade and head.
To work on the muscles between your shoulder blades (rhomboid and horizontal trapezium), place a Thera-band across the upper back and hold both ends in your hands. Turn your arms outward and push them against the band; at the same time, bend your knees and spine. Try to pull the shoulder blades apart. You will probably already feel the rhomboids quite clearly - ideally a feeling of “healthy” pain, as if those muscles have been waiting since the beginning of time for this moment! Don’t overdo it - and keep breathing! Stretch the legs and spine and bring the shoulder blades towards each other again.
Repeat this movement two or three times. Then put the band down and take in the liberated sensation between the shoulder blades. (RYNLYS p.51)
Finally, visualise an ascending current through the levator scapulae and a descending one through the trapezius. Travel with your fingers from the shoulder blade to the upper transverse processes of the spine, and from the back of the head along the trapezius downward to the acromion. Repeat on the other side.
Day 27
Constructive rest day!
Settling into constructive rest try rolling your left side towards your center, and the unrolling as if you were a carpet. Repeat on the right.
During constructive rest, stretch an arm out on the floor near your pelvis, palm up. Using just the wrist (not the shoulder muscles), gradually move your hand and arm out to the side, letting the full weight of your arm settle into the ground between movements.
Image all the bone rhythms of the shoulder blade on one side. Image moving your arm from the clavicle at the sternume. Imagine you are standing and your arm is a rope, hanging from the sternum. Let the rope swing.
Recall all the muscles you can. What happens to these muscles if you imagine raising your hand. Feel the currents of these muscles and the directions in which they elongate and shorten. Let them move excentrically to gently settle you even further into the floor.
Day 28
Today is about releasing the shoulder girdle.
This is an extension of tuesday’s exercise. Imagine your arm is a rope. Let it gradually become a rope, from the hand up. The hand swings on the wrist, the forearm swings from the elbow, the arm swings from the shoulder, and the whole rope swings through the clavicle from the sternum. Lean over to the side, and let this rope hang and dangle. Let it fully swing from the sternum for two minutes. Keeping the rope swinging from the sternum, straighten up into standing position. Compare left and right arm.
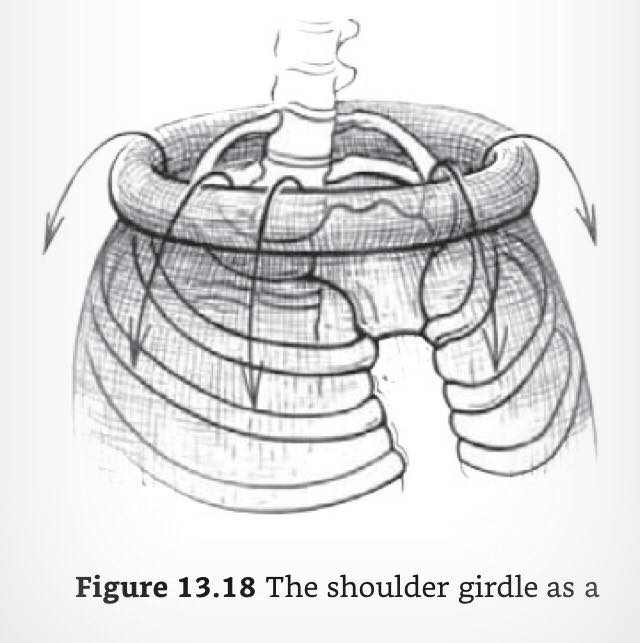
Picture your shoulder girdle as a cape, lightly draped around your ribcage. It is open in front and attached to the top of the sternum with a sparkling diamond pin. Imagine a soothing wind blowing. As the wind sends ripples through the soft cloth the cape (shoulder girdle) lifts, creating a space between the rib cage and cape. As the wind dies down, the cape slowly settles against the rib cage. Repeat this exercise 2 or 3 times. (DATI, chapter 13)
Think of the shoulder girdle as a turtleneck sweater. Imagine the turtle neck being rolled down the sides of the thorax and the thorax emerging from the turtle neck. Visualise the sweater rolling down in increments. Watch it roll down on exhalation and widen on inhalation. Think of the sweater as being made of very wide mesh. As you inhale, imagine the mesh widening even more (DATI, chapter 13).
Imagine your armpits becoming deep and soft. Think of having tiny balloons in your armpits, inflating as you inhale and deflating as you exhale. Simultaneously, think of the back of your neck being soft and your jawbone heavy. Watch the balloons deflate as you exhale making a hissing sound. Finally, imagine the balloons dropping out of your armpits on exhalation, leaving a hollow wide-open space behind. (DATI, chapter 13)
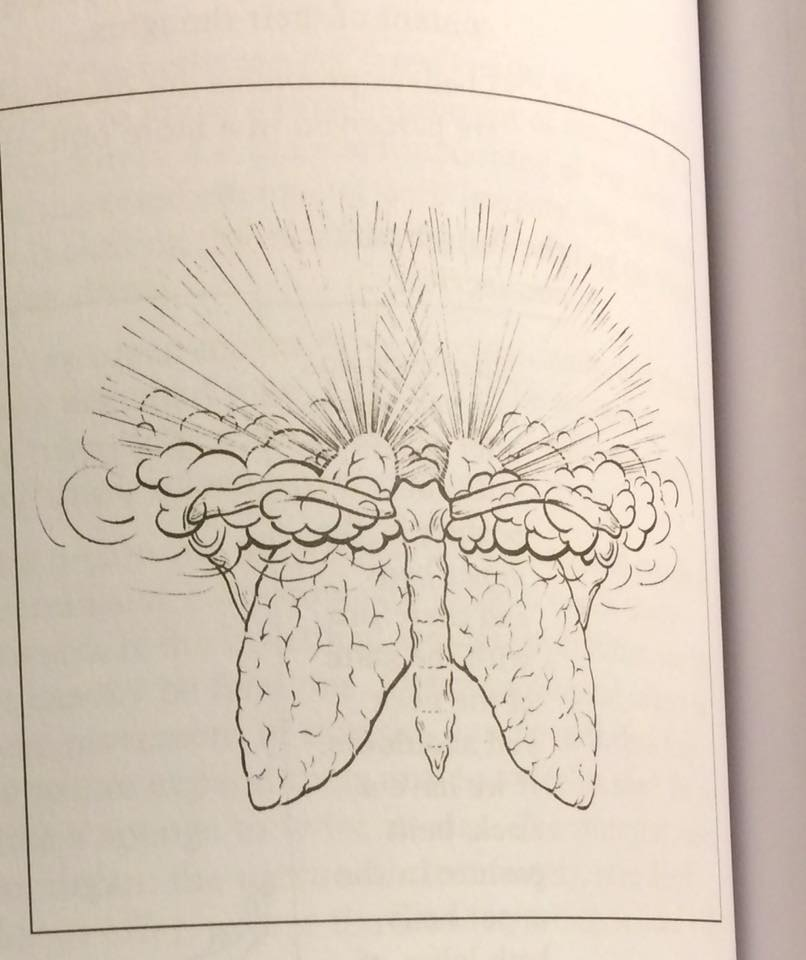
Imagine the valley in the top of your scapula (between the inside and outside ridges) as being filled with soft, fluffy clouds.
Now imagine the whole shoulder girdle as a ring of clouds around the lungs. As you lift up the shoulder girdle, imagine the lungs disappearing below and among the clouds. As you lower the shoulder girdle, the tops of the lungs stick out above the clouds like mountain tops in the sunlight (RYNLYS).