100 Days of Franklin - Week 3: Plié movements
After working on resting, standing and sitting positions, for week three, we’re going start on some movement (finally!). Pliés involve an astounding amount of the body: feet, ankles, legs, knees, pelvis and spine. We’ll work on each of these body parts in greater detail in other weeks, focusing this week on a more holistic movement, involving all of them.
Pliés are a fancy French term for flexing at the ankles, knees and hips, to bring the upper body down. In ballet, a plié has some more specific constraints on it. In our case, we will mostly focus on a plié with feet aligned for walking (the line from heel to 2nd toe goes forward, as do the knees, during the plié).
I’ll assume a fairly great amount of anatomical knowledge for this week. If you have any problems, let me know. In the meantime, I’ll post in the comments some illustrations with some landmarks we will be referring to:
- pelvic halves
- iliac crests
- pubic symphysis
- sit bones
- sacrum
- coccyx
- ASIS (Anterior superior iliac spines)
- PSIS (Posterior superior iliac spines)
- greater trochanter
- acetabulum (this is the socket part of the pelvis where the femur heads fit)
- femur
- femoral condyles (two wheels at the end of the femurs, which articulate with the tibia at the knee)
- patella (knee cap)
- tibia
- fibula
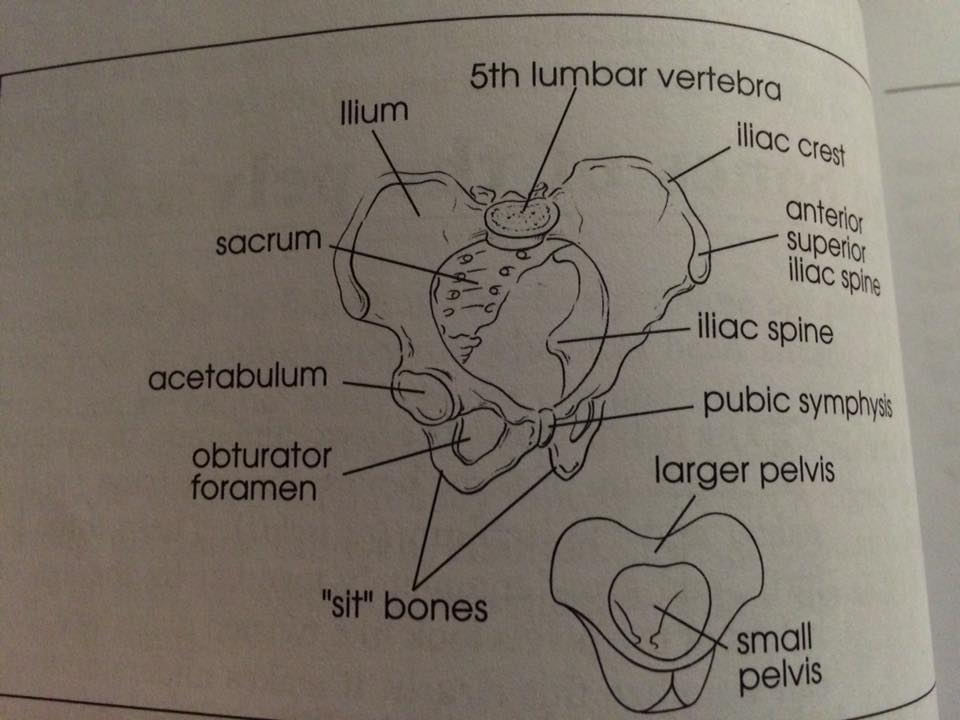
(Illustration from Pelvic Power)
Day 15
Let’s start with some tapping of the pelvic area, and make sure we’ve identified the following landmarks:
- ASISs (bony protrusions sticking out of the front of our pelvis - they are the front part of the iliac crest)
- PSIS (bony protrusions sticking out of the rear of our pelvis - they are the back part of the the iliac crest)
- Sacrum - An inverted curved triangle, at the base of our spine, closing the rear of the pelvis (between the PSISs)
- Coccyx (or tailbone) - bottom few vertebra, below the sacrum
- Sit bones - The bottom of each of our pelvic halves - in an ideal world, we sit on them
- Pubic symphysis - where the pelvic halves join at the front.
- Acetabulum - hip joint. The hip joints are above the sitbone, about index-thumb width apart, pretty much in the middle of the crease that is formed when you flex your legs.
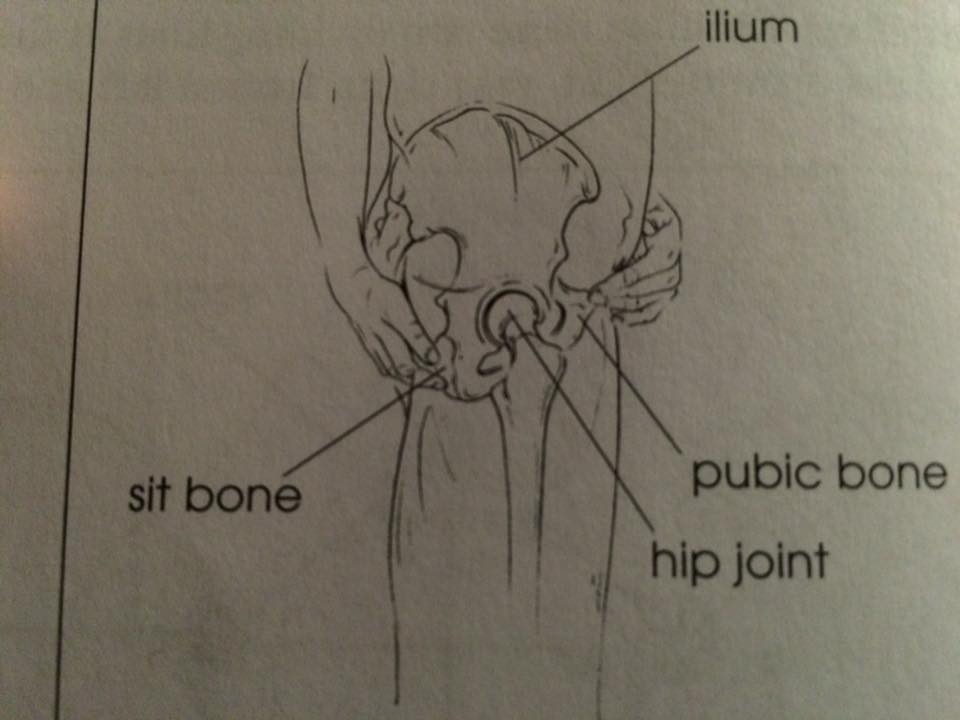
(Illustration from Pelvic Power)
Now, do a dozen or so pliés, focusing on where you are at today. How much range of motion do you have before your torso or arms need to move to balance? How far down do you go (keep your heels on the floor)? Do all three points of articulation (hips, knees, ankles) continuously flex until you reach your maximum? Is one of the three articulations the limiting point of your plié?
What happens to your spine during plié? Can you feel the increase of the curves of the spine. Check your range of spine motion in all directions from plié as opposed to straight legs.
During plié, the pelvis moves in three dimensions.
-
In the frontal plane (the one that splits you front and back), the pelvis spreads at the bottom and narrows at the top, articulating at the pubic symphyisis (you can also think of a front-back axis as being the “pivot pole”). The ASISs come together, as the sit bones move apart.
Do some pliés saying, while going down “sitbones spread apart, ASIS come together”, and while going up “sitbones come together, ASIS spread apart”
-
In the horizontal plane, the pelvis fans out like a butterfly, again articulating at the pubic symphysis (you can think of a top-bottom axis as being the pivot pole). The PSIS spread apart, the ASIS come together even more, and the sit bones fan out even more.
Do some pliés saying, while going down “Rear of the pelvis widens, front of the pelvis narrows” and while going up “Rear of the pelvis narrows, front of the pelvis widens”.
Accompany this movement with hand motion on the sides of your pelvis, letting your hands caress from the PSIS all the way in to your belt buckle on going down, and reversing on going up.
-
In the saggital plane (the one that splits you left and right), the pelvic halves rotate forward compared to the femurs at the hip joint (the ASIS comes closer to your knee), but more importantly, rotate back compared to the sacrum (at the sacro-iliac joint). This lets the sacrum nutate (nod forward at the top, come out at the bottom). The net result is mostly that the pelvis rotates slightly back compared to the ground. Compared to your spine and sacrum, you should feel a greater backward rotation (the sitbones rotate away from the tail bone).
Do some pliés, placing your hand on your sacrum (I prefer placing a finger along the length of it, to better feel what it is doing), and imagine your tail going down to the ground. Imagine as you go down, your sacrum is lifting your tail and your tail swishes out. As you go up, your tail is dragged back in again.
Repeat each set of movements, imagining the pelvic movement as the source (rather than consequence) of the movement.
Day 16
It’s spiral time!
For today’s tapping, make sure you get the hip sockets, the greater trochanter, all the way down the femur to the knee.
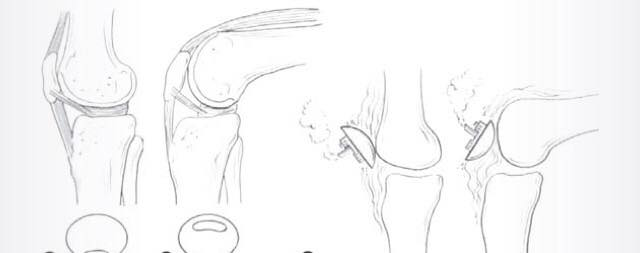
The femur meets the knee joint with two condyles, like two small wheels, the outer of which is smaller than the inner. The knee joint is held in position by the knee cap, which nestles between the two condyles. The top of the tibia is a flat surface on which the menisci rest to welcome the the femoral condyles.
Going down to the ankle, the tibia splits off on the outside into the fibula. The tibia forms the main weight bearing joint with the talus (ankle bone), with the fibula providing some minimal weight bearing and lateral stability. The central line of weight when doing plié will track from the heel over to the 2nd toe.
Because of the asymmetric shape of the condyles, when going into plié, the femur rotates out, and rotates back in when coming up straight again. Because the fibula has further to travel over the talus in flexion, the lower leg (tibia+fibula) rotates inward by about the same amount as the femur rotates out, allowing the knee to track straight over the 2nd toe. The heel to 2nd toe line remains about constant, with the increased spread of the foot distributing as if the foot were rotating (or fanning) outwards. Add to this the movement of the ASIS/sit bones, and we have:
- Plié. ASIS rotates in, sit bones flare out, femur rotates out, tibia rotates in, foot rotates out.
- Déplié. ASIS rotates out, femur rotates in, tibia rotates out, foot rotates in.
For today, we’re going to image each of these in turn, starting with the right leg. Stand on your right leg, with your right foot out in front of you for balance.
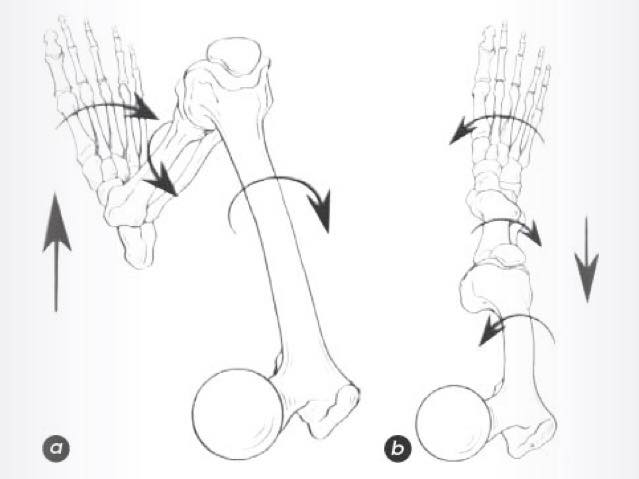
(Illustration from DATI - a: plié down, b: déplié up)
You or a partner can help in the image by providing “assistive” rotation with your hands. (Note that the rotational movement is small, is more relative to surrounding structures as it is absolute in space, and that these images are designed to let rather than force the movement to happen).
-
First the femur. The femur rotates around a line going from socket to condyles, with the most distant part of the femur from the line - the greater trochanter - moving most noticeably in actual amount. As you go into plié a dozen or so times, say “femur rolls out”, as you come back say “femur rolls in”. You can also image this movement with your arm, making the same movement, as if your elbow were the greater trochanter (a giant, magnified distance from the shoulder “hip socket”). As you make this movement, you can also imitate the movement of the femur in the saggital plane as it moves away from vertical and back.
-
Next the tibia-fibula (we will work more on these and the feet in a separate week). As you go into plié, notice how your tibia rotates in. Does it rotate in as much as the femur rotates out? Can you image the fibula travelling further on the talus and helping in the inward rotation?
-
And the feet. Going into plié imagine the feet sliding or pivoting out on the floor like windshield wipers. As you straighten up, imagine the feet sliding back in. Try the opposite image. Which works better? (Note that the feet are super complex, with many internal rotations happening)
We’ll work more tomorrow on combining images, but as you go into plié, imagine that the different rotations (sort of counter-spirals) each allow energy to be stored, as if you were winding up a watch, allowing you to straighten back up again effortlessly.
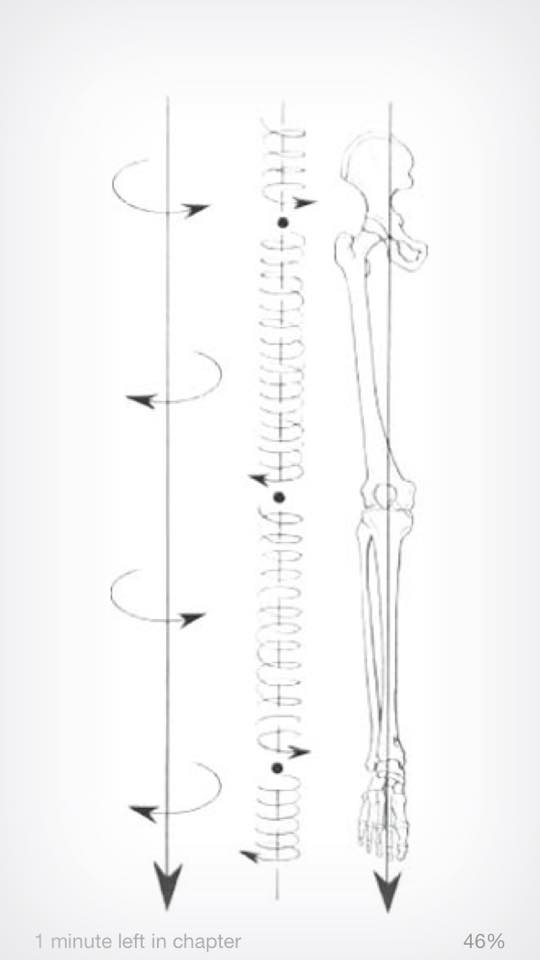
(Illustration from DATI)
Walk around, comparing your left and right leg. Repeat each of the images on your right leg, then on both legs simultaneously.
Day 17.
Today we’re going to work on some imagery for the hips and knees.
Work first on one side, then on the other, to really feel the difference created by these images.
When standing straight, imagine the head of your femur as an eye looking forward. As you plié, this eye increasingly looks upward and into the acetabulum. Do a dozen or so pliés imaging this. Now add your palm cupped down and slightly out to represent the acetabulum, and your fist to represent your femur head, and repeat the image with the motion of the arm.
As we saw yesterday, the knee is formed by the two femoral condyles (wheels), meeting the tibal plateau, with two menisci as buffers, and a patella to hold the whole thing in place.
When the knee bends, the femoral condyles are almost rotating in place. The way this rotation works is that they are both rolling (as if they would roll backwards, off the tibial plateau) and sliding (so that they don’t roll off the tibial plateau). Do some pliés/dépliés saying “the condyles roll back, slides forward, and spin; the condyles roll forward, slide back, and spin”, imitating these movements with your fists.
Seen from the tibial plateau, on the other hand, it looks like the condyles are slide/rolling away forward. So the tibia feels like it is sliding back against the femur. At the same time, the whole joint is tracking forward. Image that!
Last, the knee cap. On the underside, is like a rocker. As the condyles roll and slide, they leave the knee cap behind, touching the top part of the rocker. Seen from the knee cap, it is relatively sliding down and away, as if it were on a slide, or a boat riding a wave. Do some pliés with that image.
(Illustration from DATI)
Day 18
Today we’re adding some ideas for putting various individual bone rhythms together for plié.
You can imagine any of these as the source or consequence of the plié. You can also imagine any of these movements as creating a stretch which will allow you to spring back out of plié.
- The sacrum and sitbones form a triangle supporting your pelvic floor. As you plié, the three points of the triangle move away from each other, expanding your pelvic floor.
- The sitbones widen and fan out. At the same time, the greater trochanter rolls out. The net result is that as you plié, the greater trochanter moves towards the sitbones
- The ASIS and tibia are joined together in the inward spiral on plié.
- The femur and foot are joined together in the outward spiral on plié.
- The sitbones and heel bone are joined together on outward flare on plié (heel bone flaring out is an movement we haven’t discussed before)
Continuing with the some of Sweigard’s lines of movement, introduced last week, the more directly relevant to this week are
- Line 5: widening of the back of the pelvis
- Line 6: narrowing of the front of the pelvis
- Line 7: center of the femoral condyles to hip joint (remember the hip joint is often quite further inward than we imagine)

Day 19
It’s friday - constructive rest day.
First, do a few pliés to remind yourself of all the bone rhythms we have seen this week.
Now lie in constructive rest, spending some time imagining you are doing pliés in standing position. On the right hand side of your body, image each bone rhythm for these pliés. When you come out of constructive rest, compare how plié feels the two sides, and complete imaging left side for symmetry, if needed.
Day 20
Today we’re going to work on some ideas for smoothing our pliés.
- Imagine your femur heads are buoys, floating in water. When you plié, the water goes down and your femur heads float down (as does the rest of your body).
- Picture your femoral condyles at the knee. They are not perfectly round but are more spiral shaped. As you go into plié, the tibia moves closer and closer to the center of the spiral.
- Picture your femoral condyles as two wheels. When standing, are you using the the inner and outer wheel of each knee equally? If you feel there is too much weight on one wheel, inflate that wheel’s tire to rebalance your knee. (DATI chapter 11)
- Under each condyle is a meniscus. This meniscus provides a smooth transition to the tibial plateau. Imagine your menisci are hanging from the center of their condyle and swinging like a pendulum. Seen from the femur, they swing back on plié and forward on extension. -Extending this image, imagine the menisci and the knee cap are chasing each other. As you go down, the patella slides down and chases the menisci away (back). As you go up, the patella slides up and the menisci come forward, chasing the patella.
- Take small jumps, using just the right amount of plié to land. How smooth can you make this landing? Can you use the stretch in the pelvic floor and in the leg spirals to perform the next jump? How big can you make your jumps before the plié is not so good? What happens if you reverse any of the bone rhythms. Is it more or less effortful to jump and/or land?
Day 21
Last day of pliés! How do they feel? Did you get any changes this week?
Today we’re going to do a personal favorite of mine: climbing stairs.
First, we’ll look at walking. As the leg swings forward to take a step, from the pelvis-femur point of view, there is a lot of similarity with pliés. One difference lies in what is happening with the carrying or weight-bearing leg.
As you walk, can you feel how the femur head of the weight-bearing leg carries your whole body over to the next step?
Now check your ASISs. What do they do when walking? Can you feel the ASIS of the swinging leg swing back (relatively), as the pelvic half rotates back in counter weight? At the same time there are two or three other things happening (pelvic halves shearing, ASIS rotating inwards, actually walking forward, etc.) which might mean that the net movement of the ASIS is not “back” - but let’s not dwell on that too much for now. The weight-bearing ASIS is doing the opposite, at the foremost point of its rotation and extension when giving weight to the next foot.
And check your femurs. Can you feel their rotation when walking. As the leg swings foward, the femur rotates out slightly (and the ASIS slightly in). As you tranfer weight, and take the step, all the potential energy in that rotation is release, allowing you to power through, effortlessly to the next step.
Now let’s climb some stairs! Look at the the leg getting ready to take a step. Can you feel how the pelvic half is rotating back when you lift your leg to the next step? Can you feel how the femur is rotating out? What’s happening with the tibia and foot (I’m not quite sure)? As you take the step, can you feel how the spirals are relased into an extra powerful extension?
Enjoy climbing the whole flight of stairs, head and torso just floating up effortlessly, powered by your bone rhythms.
Next week we’ll work on the shoulder girdle. Until then, may your movements always be full of spirals.