100 Days of Franklin - Week 2: Sitting and Standing
After a week of lying down (Yay, a whole week! Go Team!) we’re going to work on standing and sitting, and think about our posture. For sitting, a stool, or other flat, hardish chair that you can sit on and have your feet flat on the ground, thighs horizontal would be great.
Franklin talks a lot about movement, alignment, and posture, in particular in chapter 2 of Dynamic Alignment Through Imagery (DATI): “Your movement is only as good as your alignment permits. Your alignment is only as good as your economy of movement”.
If good posture/good alignment are both the source, and consequence of movement, and excess muscle tone prevents movement, it makes sense that any muscle tone that increases alignment in a static position, will also hinder movement from that position.
On the other hand, release of tone in one muscle group is going to cause (or be complemented by) a relative increase (or feeling of increase) of tone in antagonistic or complementary muscles groups. So a lot of the postural work we will be doing is as much redistribution of tone throughout the body, as it is release of tone. But Franklin suggests starting off with only focusing on release.
I’m getting this discussion out of the way now, and for the rest of the week, we’ll work with the shortcut idea that we are mainly trying to release tone to achieve good alignment - and that “holding” as a means for improving posture is not a viable proposition.
I’ll also add an idea that is important to Alexander technique, and also touched on by Franklin: if our current posture feels “right”, better posture will feel “wrong”. At best, we will feel like we are trying to change and become something else. It’s natural for our brain to feel a very strong resistance to this. Take your time to properly experience your body’s dynamic alignment and be patient as it adapts (or fears to adapt) to new ways.
See you tomorrow morning. And may you always feel as if your body is willing to redistribute tone in an optimal way.
(note for people who did this last year: I cut about half the material out, to re-use at other points and make this week less overwhelming)
Day 8
Start with standing. Note how it feels (both in terms of quality and how the body parts relate to each other). Remember that even if it feels “good”, or “ideal”, you may have to abandon this feeling over the course of the coming week (and over the course of the rest of your life).
From this “starting” position, imagine movement at each articulation. Imagine your head moving left and right, up and down. Imagine bending at the hips, knees and ankles. Imagine your spine flexing in various directions at different points. Imagine your arms articulating in all possible ways. And now experiment with initiating small versions of these movements. Are you able to do them easily. Or do some of them “stick”, indicating that your current posture is slightly hindering your movement? (Note: this is a great diagnostic for good alignment in any position or movement).
Take some Franklin balls (or your hands).
- Tap up the sternum, along the clavicles and all around the shoulder girdle.
- Tap up and down your arms.
- Simultaneously tap:
- your sternum and the top of your thoracic spine.
- your sacrum and your sternum.
- your sacrum and the back of your neck.
- your sacrum and the top of your head.
Notice if your posture and/or potential for movement have changed. Take note of how your new posture feels. Where does it feel different? Where does it feel “wrong”?
Day 9
Same as yesterday, but sitting on a stool. Notice the small reflex movements you make even when you think you are sitting still.
Again think of good sitting posture. From this position, think of various kinds of movement and try to initiate these movements.
In particular, imagine getting up. And initiate the movement. Does your sitting posture allow you to immediately rise or do you have to adjust it to “prepare” that movement?
(In general, ability to transition seamlessly from standing to sitting and vice-versa is a great diagnosis tool for dance and movement)
Repeat yesterday’s tapping while sitting and examine how it changes your posture and ability to move.
Day 10
Start with standing and use the last two day’s tapping to find the posture your body would like to be in. Notice how it feels.
Now, let’s work with the planes we worked on in constructive rest on sunday. One splits you back to front, going through earlobes, shoulder tip and greater trochanter. The other splits you side to side, going through nose, breast bone and pubic symphysis. Note where your axis is (at the meeting of these planes). Feel as if your body is clouds, surrounding this central axis, like clouds surrounding a high mountain and walk around for a while.
When you come to a standstill, notice the small reflex movements your body is continuously making, adjusting, keeping you upright, always moving, even when you are at rest.
Finally, roll all the way down, starting from the neck, and gradually releasing one vertebra after another. Roll back up starting by letting the sacrum point to the ground, as if gravity pulling down on your sacrum was winding you back up, one vertebra at a time. Repeat this roll down and up 2 or three times, taking care to leave your neck as released when standing up as when it is rolled down.
Day 11
Today we’re going to experiment with different images, models and metaphors for how the body maintains its shape. Work with them standing, walking, sitting down, sitting, standing up. Put some music on and work with them dancing. Probably don’t do all of them. Or work on them throughout the day and see what happens.
- The head is a hot air balloon. The rest of the body hangs down from the head
- The body is a water spout. The head floats on top of it.
- Mixing 1 and 2, there is upward energy in the trunk, surrounding the spine. There is hanging or floating in the arms, legs and head
- Newton’s 3rd law: in order for the head to release up on top of the neck, the legs and feet must release down into the ground (this is particularly true while sitting)
- Borrowing from Alexander technique and expanding on 4, the body wants to expand and allow itself to occupy space in all directions. Head goes up, feet and sit bones go down. shoulders (clavicles and shoulder blades), ribs and elbows go out. Sacrum goes back, knees go forwards, sternum goes forwards, neck goes back, head goes forward. The sacrum is far from the heels. The sacrum is far from the sternum. The sacrum is far from the head. The head is far from the shoulders. None of these distances are created actively, but noticing the state of these distances allows you and your body to let the distances happen
- The body is a skeletal system, with all force being transferred through the joints ad bones. To stay upright everything must be nicely stacked.
- The body is like a pile of water balloons. The Skeleton provides spacing and direction but does not bear the brunt of the force. 8. Imagine when you are standing that you are a kangaroo (or a dinosaur, or a dragon). Your sacrum and tailbone reach all the way down into the floor, providing support in standing, with your weight slightly to the front of your feet.
- Lulu Sweigard (cited in chapter 1 of DATI) discovered 9 lines of movement along which postural change takes place. We’ll work all these lines over the coming weeks. For each line, imagine you have potential for lengthening (or shortening) along that line. For now we’ll just take two (lengthening) lines.
- Middle of your thoracic spine down through your sacrum
- Top of your sternum to top of your spine (note that the top of your spine is approximately between the bony protrusions behind your ears)
- Imagine you are a tree. The trunk supports the branches which hang down. These branches are covered in snow which you feel and hear slide off: flump!
Which of these metaphors appeal and/or work for you?
Day 12.
It’s friday! Constructive rest day. Lie at least 7 minutes in constructive rest, working on your favorite (and maybe least favorite images) of the week.
- Remember that even when lying, your alignment is dynamic. You are not in a static position, but are constantly micro-moving and adjusting.
- Imagine your potential for movement. Are all your joints easily able to move?
- Imagine that when standing you can always effortlessly sit. And from sitting you can always effortlessly stand.
- Image your spine rolling up and down.
- Imagine yourself as a kangaroo-dinosaur-dragon (kangasauragon? drangasaur?)
- Imagine your favorite metaphors for the body from yesterday. How do they convert to the supine position?
- Having practiced your imagination, imagine you have the perfect body. Any nagging problems you have experienced these past few weeks, just imagine them away.
See you tomorrow!
Day 13
Today we’re going to use the orange Franklin balls. If you don’t have any, one or two rolled up towels can substitute.
First, sit and proceed with the same tapping as previous days: arms, shoulders, sternum, simultaneous sternum and spine, sacrum and sternum, sacrum and back of neck, sacrum and top of head. Roll down and back up. Image rolling down and back up. And roll down and back up again.
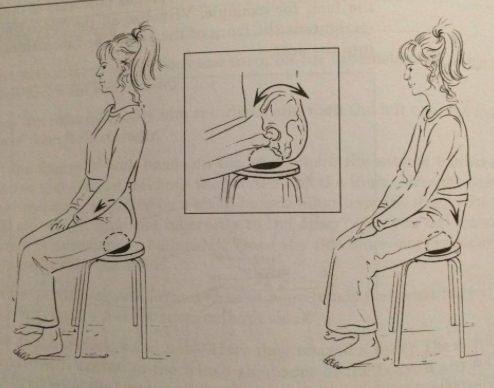
- Sit on the balls, placing them slightly in front of your sit bones.
- Once you are able to balance on the balls, tilt your pelvis forward and back.
- Now take away one ball, and let the free sit bone swing forward and back, imagining you are painting thick brush strokes on an oil painting.
- Try painting circles, figure eights, writing your name.
- Try to paint in 3 dimensions.
- Put back the first ball and repeat, taking away the ball on the other side.
- Then remove both balls. How does it feel to sit on the stool?
This exercise is adapted from Pelvic Power 3.17, which Franklin calls “the pelvic floor ball miracle” - how was it for you?
Imagine rolling down and up. Picturing each vertebra releasing and coming back into stacked. Notice how you feel. Now roll down and up and notice how you feel. Roll down again and imagine dropping your pelvic floor as the source of power for rolling back up.
Day 14
We’re going to close this week by seeing how the feet and fascia affect our whole standing posture.
We’re first going to roll the left foot.
Roll your left foot on the Franklin ball in all directions:
- Side to side along the ball of the foot.
- Side to side along the heel, front to back.
- Pinching the ball with the edges of the foot, going all round.
- Rolling the whole foot from front to back, as if rolling dough.
- Grab at the ball with your toes as if you were trying to pick it up (don’t worry if you can’t)
- Rock your weight back (on right foot) and forth (left foot), onto the ball and off it again, giving yourself a short pause of balance on top of the ball.
Check how your balance and posture has been affected. Do you feel more grounded? Do your pelvis, spine, or shoulders feel more relaxed? How do the left and right sides compare? How does standing on one leg feel? How is your potential for movement?
Repeat with the right hand side.
Move to sitting.
If you release the muscles around your coccyx, it may help you to feel more centered on your sitbones. Imagine your tailbone to be a chain of ringing bells (DATI chapter 17)
As you get up, walk about and come into rest standing, what happens to the ringing bells? Do the ringing bells affect your neck and head. How about if you let your whole spine be a chain of ringing bells?